Showing posts with label Glitter and Hot Glue. Show all posts
Tuesday, March 31, 2015
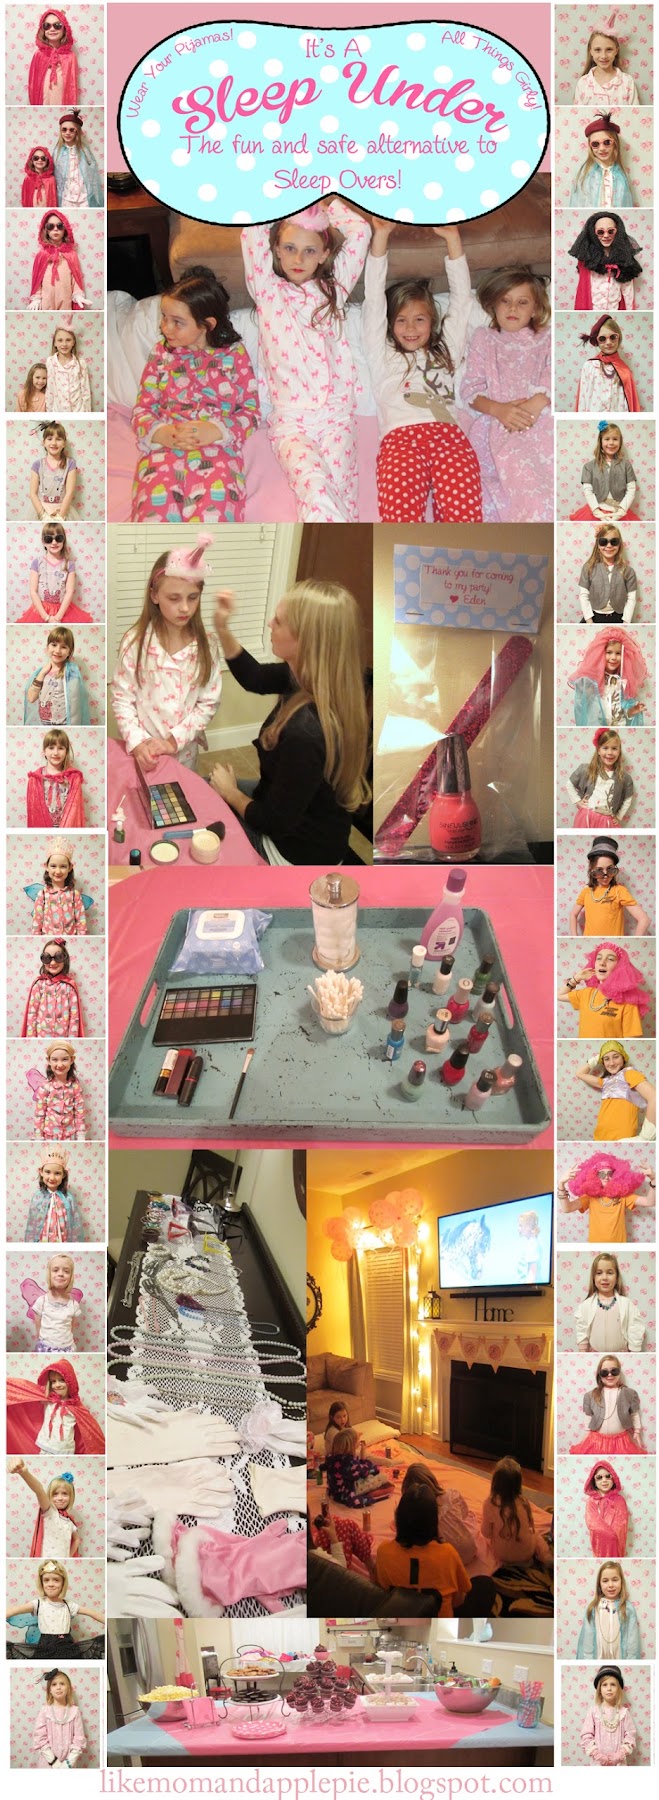
Sleep Under Birthday Party
For safety reasons in our home, we don't do sleep overs. Don't go to them, don't host them. However there is still a lot of fun to be had with your kids in this! We call them "Sleep Unders".
Kind of like a sleep over, except everyone goes home when it's bedtime.
Still have all the fun, and everyone stays safe!
For Eden's 8th birthday she wanted to have a Sleep Under.
She asked to do makeovers and have a photo booth, watch a movie and eat chocolate cupcakes with chocolate icing and drink Izzes.
Your birthday wish… my command my darling!
Wednesday, December 3, 2014
LDS Baptism- Free Announcement and Program Printables
My sweet E just turned 8, and part of turning 8 means baptism in our church (you can read more about that HERE) and my Eden could-not-wait!!
She was so excited to be baptized by her Dad!
We found her a beautiful baptism day gown (at prettyflowergirl.com HERE)and the perfect accessories. Gloves found HERE (they usually offer a discount on the add-on accessories if you're purchasing a dress).
Free Vintage Ballerina Poster Printables
For the bathroom my two little girls share, I wanted artwork that was girly, but not frilly since the boy uses it sometimes as well when it's more convenient than his Barber shop bathroom.
I decided on antique ballet.
Unfortunately I couldn't find what I wanted ANYWHERE.
So… I turned to photoshop to create my own awesome artwork.
Friday, August 29, 2014
Frozen Birthday Party and FREE Printables!
Just like every other little girl in the world, this year my Ada just HAD to have a Frozen birthday party.
What kind of mother would I be if I didn't comply?
So here is my girl's Frozen Party…
Complete with FREE PRINTABLES!!
Monday, January 28, 2013
50 100th Day Of School Project Ideas
My Kindergardener recently had her 100th day of school.
To celebrate being 100 days smarter her teacher asked that they create, on poster board, a picture using 100 items and to be creative.
Well, I was kinda tired that day so I decided to just ask my friend the Google.
Sadly didn't find much.
*shake of head*
That won't do.
Tuesday, July 31, 2012
Soda Bottle Mailer Tutorial
Friday, July 6, 2012
Tuesday, June 5, 2012
How to Make A Diaper Bouquet
Remember this beauty from the Sugar and Spice baby shower?
Here is a step by step on how to make one yourself.
Wednesday, February 29, 2012
DIY- Triangle Banner
Sunday, October 30, 2011
DIY: Silhouettes
Tuesday, March 22, 2011
Wooden High Chair Makeover
My mom got this high chair for me from a friend who was moving.
It had a honey oak finish on it.
I thought it would be much more darling painted Tiffany blue (every girl's favorite color) with a red polka-dot cushion for comfyness, non-slippidge and extra adorableness.
A little elbow sanding elbow grease, A bum load of spray paint and a touch of sewing later...
Mission Accomplished!
Happy Creating!!
Thursday, August 5, 2010
Indoor Hopscotch
Monday, August 2, 2010
Train Nursery Artwork
Sunday, August 1, 2010
Hot Pink with Black & White & Damask Nursery
Making room for baby!
Guest/Art/Catch-All/Hoarders Room
(granted this picture was taken after the clean-out had begun, it always looks worse before it looks better)
After:
Found the perfect soft baskets for her changing table
(ah...perfect fit too. I love it when that happens)
How do you get a one of a kind custom nursery?
Become a sewing fool!
It took me 3 hours to make her quilt.
An entire day to figure her curtains out, but only about 2 hours to actually make them
(my pregnant mind is incapable of doing math it seems)
It took me 8 hours to hand-stitch that bumper pad.
I now understand the statement "worked my fingers to the bone".
For her artwork I went a little less artistic and more crafty.
A touch of extra damask fabric, 3 matted frames, some wood letters, hot pink spray paint and...
It took me 8 hours to hand-stitch that bumper pad.
I now understand the statement "worked my fingers to the bone".
For her artwork I went a little less artistic and more crafty.
A touch of extra damask fabric, 3 matted frames, some wood letters, hot pink spray paint and...
Viola!
Custom Art!
This thing almost defeated me...
Almost!
First, they didn't have it in stock and said they'd re-ordered it a couple times but the company just wouldn't send any more.
I got a rain check and they told me they'd call when/if it came in.
4 weeks later and still no call.
Found other ones, but couldn't bring myself to spend $300 on a chandelier for a baby's nursery.
I was in the store the other day getting the last things I needed for her artwork and just happened to check the lighting aisle.
There, on the shelf I see it.
Everything else goes dark and blurry.
A spot light shines on the glowing chandelier,
And MO-TAB starts singing "Hallelujah" in the background.
I'm elated! (oh and thanks for the "call when it's in stock")
I attempt to purchase it, handing the lady my rain check when she points out that the rain check has the wrong price on it.
Then I point out that she is the one who originally wrote out the rain check for me.
She says that she can give it to me for that amount but I wouldn't be able to return it.
"Are you planning on returning it?" She asks.
"Not unless it's broken."
Some haggling, children running around noisily and chaotically, frustrating the lady with sideways glances and deep sighs, me doing nothing to remedy it (on purpose) and I end up getting the Chandelier for $19.99 .
I never thought I'd be thankful for children who lose all sense of how to act normal in public.
The Mr. comes home and I smother him in kisses and hugs and with batting eyes while rubbing my enormous belly I hand him the chandelier.
He laughs then takes it upstairs to install.
Turns out it's not a normal light fixture, but a hanging lamp, with a normal plug and everything.
It comes with 2 lines of installation instructions.
1. Screw hook into ceiling.
2. Hang light on hook
Gee thanks!
If only it said that ON THE BOX!! (which it didn't)
Now of course I'm unable to return it.
No worries though.
My amazing Mr. put his genius mind and engineering degree to work.
1. Screw hook into ceiling.
2. Hang light on hook
Gee thanks!
If only it said that ON THE BOX!! (which it didn't)
Now of course I'm unable to return it.
No worries though.
My amazing Mr. put his genius mind and engineering degree to work.
Some mathematical calculations, electrical ingenuity, spare parts from Eden's old light fixture and...
TA-DA!!
The perfect Chandelier is once again PERFECT!

There is no end to this man's amazingness!
TA-DA!!
The perfect Chandelier is once again PERFECT!
There is no end to this man's amazingness!
The Mr. thinks it's a little "goth", but works.
I think it's completely Haute Couture and love it oh-so much.
Her whole nursery turned out exactly how I pictured it.
Ah, I love it when that happens!
Happy Creating!!
Friday, May 28, 2010
Teacher Gift Idea: "Grow" Plant
Simple end of year Teacher Gift Idea

I cut the fabric into big squares and wrapped it around the pot, then tied it with a coordinating ribbon to keep it in place.
Used coordinating scrapbook papers to create the tag.
Added a cute picture of my E, then punched a hole in both, then tied them to the pot's ribbon with a smaller coordinating ribbon.
The teachers LOVED them!
Happy Creating!!
Eden's last day of Preschool is upon us for the year.
So to say "Thank You" to her amazing teachers, we put together these cute flower pots.
E picked out the flowers, this fun fabric and insisted on these pink sparkle flowers for the tags.
The rest I put together to make it look, well... put together.

The rest I put together to make it look, well... put together.
I cut the fabric into big squares and wrapped it around the pot, then tied it with a coordinating ribbon to keep it in place.
Used coordinating scrapbook papers to create the tag.
Added a cute picture of my E, then punched a hole in both, then tied them to the pot's ribbon with a smaller coordinating ribbon.
The teachers LOVED them!
Happy Creating!!
Subscribe to:
Posts (Atom)